Monday, November 28, 2016

Christmas Tree Advent Calendar

Hey guys!  It's been forever since I last posted, I'm really sorry about that.  The whole "life" thing just keeps getting in the way.  Plus I've been on project-hiatus for a while now.  It seems like everything in the works was finished and I just never started anything new.  It's hard to paint and redo furniture in the winter because I usually do everything in my garage or driveway, and it's way too cold for that in the winter.  

Anyway...I finally have a little DIY project to share with you!  This is my advent calendar Christmas tree.  
I started doing this last year after my makeshift picture frame advent calendar kept falling apart.  Turns out this was so much easier!  Plus, as we took each day off the tree we replaced it with the Christmas cards that came in the mail.  So functional!

 Here's a list of supplies you'll need to get started:

*A smallish Christmas tree - I got ours with my Rite Aid rewards during an after Christmas sale for 90% off back in the day when I used to coupon, circa 2010.
*Gift tags - Mine are from Target Dollar Spot last year.  They came in a small canister and had something like 50 tags plus twine for $3.
*Markers or any other writing utensil of choice - I happened to have metallic Sharpie paint pens in my stash.
*Something to attach the gift tag to the tree - I used clothes pins from Target Dollar Spot from last Christmas.  I think they came in a pack of 10 for $1.  You could also use string or twine to loop through the tag and hang on the tree.
*Christmas scriptures/stories about Jesus - I found a list of scriptures that includes verses from both the Bible and the Book of Mormon since we're LDS.  You can find the one I used here, or search for your own on Pinterest/Google.

Friday, November 6, 2015

How to Paint a Dresser in a Day + French Provincial Dresser Makeover

As with painting walls, painting furniture can be pretty intimidating.  But let me share a little secret with you - it has pretty much become my DIY mantra: Don't be afraid to ruin something you already hate.  And that's where my love of painting all the things was born.   

I used to run my own knit/crochet business making newborn hats and other goodies from 2008-2013.  Working 40 hours per week from home with three kids under 5 wasn't worth the stress or the income, so I shut it down and focused my energy on going to the gym, taking care of myself, and being a better mother.  When my fourth baby was born in July of this year, the doctors discovered he had a rare congenital tumor in his lungs and he needed immediate surgery to remove one of the lobes of his lung.  Long story short, we try to keep him away from people to hopefully minimize his risk of getting RSV this season since he's already short part of his lungs.  So instead of spending my mornings dropping my kids off at the gym daycare and lifting weights, I've had to find a new hobby to fill the void.  Enter all my house projects, furniture makeovers, and my love of thrifting.  

The very first dressers I painted were a super ugly set that my husband had used in his childhood bedroom, which we then took with us when we got married almost 10 years ago.  They're probably 40 years old and I absolutely hated them.  I tried as hard as I could to convince my husband that we needed to take them to goodwill and get some snazzy IKEA dressers, but, being the frugal one of the marriage, he refused to throw away perfectly good (and ugly) furniture.  Now I'm so glad he did because years later it totally jump started my love of redoing furniture.  


Fast-forward to present day, I've painted everything under the sun - dressers, end tables, chairs, upholstered chairs, a piano, vases, picture frames and decor, walls, doors, cabinets, floors.  You name it, I've probably painted it.  Now, if I can learn to do all this then so can you.  Take my hand, I'll walk you through it.  

Wednesday, November 4, 2015

5 Painting Tips You Haven't Heard Before + Foyer & Formal Living Room Makeover

Painting a room is theeee best way to transform an area.  Period.  Sure, you can shell out thousands of dollars for someone else to do the work for you, but where's the joy in that?  The sense of accomplishment you feel when you've made your house into a home is something that can't be matched.  Sometimes I feel like it's even more fulfilling than changing diapers and doing dishes all day.  Which is probably why I spend many of my nights with a paintbrush in hand once the kids are in bed.  I get it, painting a room can be intimidating, let alone painting an entire house.  But it can be done!  And it can be done extremely well and on the cheap with these 5 painting tips you haven't heard before!  These are my tried and true tips that I use everysingletime. I paint a room.  Read on, my friends!


Welcome + Free Kitchen Conversions Printable

I never know how to start these things, so let's just dive right in. We bought our fixer-upper dream house in May 2015 and I've devoted myself to beautifying her one DIY project at a time (sometimes two or three...who am I kidding). After much badgering from family and friends, I've finally started this blog to post all my updates with step-by-step tutorials and tried-and-true product recommendations. Hopefully you can gain some insight, encouragement, and inspiration from my successful (and not-so-successful) projects!

 I like to work with what I have, so most of my projects are face lifts rather than renovations. With that being said, face lifts are an excellent and inexpensive way to breathe new life into something. Other than painting, adding framed art to a room is probably the cheapest face lift with the most dramatic effect. I like to peruse the picture frames every time I go thrifting, and I've developed quite a collection of sizes and styles over the months. At $0.50-$10 each, used picture frames are something that I like to stockpile because they're easy to customize and I always have a use for them. And sometimes they even come with an amazing picture! Check out this picture I scored for just $2!  The frame was an orangey oak color and the mat was marbled blue, but I easily changed it all with a little spray paint.  And bonus, it came with this gorgeous print of the Salt Lake City Temple signed by the original artist!

Never underestimate the power of a free printable!  One of my favorite ways to find art for my home is to scour Pinterest for free printables.  Printables will work best as an 8x10 size or smaller since that's the maximum size most home printers can handle. You can also use a mat with an 8x10 opening and mount it in a larger frame for more impact.  If you're cheap and artsy like me, you can also create your own printables from your favorite quotes and sayings using design software like Adobe Illustrator.  If I find a print on Etsy that I really like, or a free print that doesn't quite suit my needs, I will try to recreate it for my personal use.  

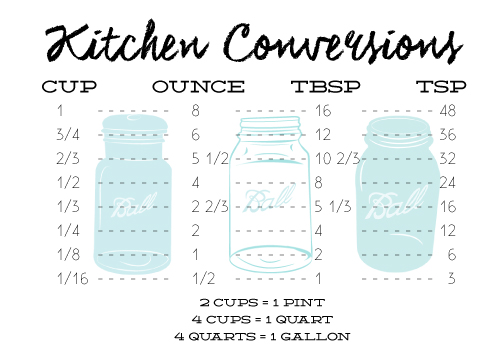
I recently found a kitchen printable I wanted to use that didn't fit my decor, so I created my own.  And lucky you, I've made it available as a free 5x7 AND 8x10 download!  Simply print it out, stick it in a frame, and slap it on your kitchen counter for quick and easy conversions when you need to tweak recipes.   
Free Kitchen Conversions Printable

More free printables, tutorials, before & afters, and product recommendations coming soon!  

xo Amanda